Shader Design - Flood Plane Simulator
As part of an exercise in AR development and Unity practice, I want to put together projects with both the City Mesh data extracted from Open Stree Map, and the terrain data extracted from terrain.party, to create a human-centric flood plain simulator.
It is trivial to create a rudamentry 3D flood risk simulator with a unity terrain and a water level plane. Here I want to try and bridge the inherrently 2D City Data, with the 3D terrain data, to extract the flood plane data and place it as an over lay onto our flat city data.
This will give us a nice and easy way to analyse the human impact of rising water levels, instead of the pure geographic impact.
The first step to create this project is to create a Surface shader to render our 3D data driver 2D water plane.
We can do this by creating a blending shader, which blends two overlapping textures, the Water Texture, and the height map.
Using the heightmap, we will set the transparency of the Water texture based on the grayscale value of each pixel in the heightmap. We can threshold the transparency value based on a water-level cut off to create an interactive floodplane.
We first start with the following images:


We will use these are two main textures in our shader. First a primary water texture ( In this case an uninspired blue material for now). And secondly a heightmap, in this case a heightmap of sheffield texture to quickly test the shader logic.
The shader logic will be as follows, for every pixel of an object, check the heighmap value, if it is below a height threshold, render the primary texture, if it is not, render the pixel as transparent. This is a simple enough concept, which translates to the following shader:
Shader "Custom/Flood"
{
	Properties
	{
		_MainTex("Albedo Texture", 2D) = "white" {}
		_BlendTex("Terrain Texture", 2D) = "white" {}
		_Transparency("Transparency", Range(0.0,1)) = 0.25
	}

		SubShader
	{
		Tags{ "Queue" = "Transparent" "RenderType" = "Transparent" }
		LOD 100

		ZWrite Off
		Blend SrcAlpha OneMinusSrcAlpha

		Pass
	{
		CGPROGRAM
#pragma vertex vert
#pragma fragment frag

#include "UnityCG.cginc"

		struct appdata
	{
		float4 vertex : POSITION;
		float2 uv : TEXCOORD0;
	};

	struct v2f
	{
		float2 uv : TEXCOORD0;
		float4 vertex : SV_POSITION;
	};

	sampler2D _MainTex;
	sampler2D _BlendTex;
	float4 _MainTex_ST;
	float _Transparency;


	v2f vert(appdata v)
	{
		v2f o;
		v.vertex.x += 0;
		o.vertex = UnityObjectToClipPos(v.vertex);
		o.uv = TRANSFORM_TEX(v.uv, _MainTex);
		return o;
	}

	fixed4 frag(v2f i) : SV_Target
	{
		// sample the texture
		fixed4 col = tex2D(_MainTex, i.uv);
		fixed4 terrain = tex2D(_BlendTex, i.uv);

		// Set the transparency based on the terrain map height
		float height = (terrain.r + terrain.g + terrain.b) / 3;
		if (height < _Transparency) {
			col.a = 1;

		} else {
			col.a = 0;
		}

	return col;

	}
		ENDCG
	}
	}
}
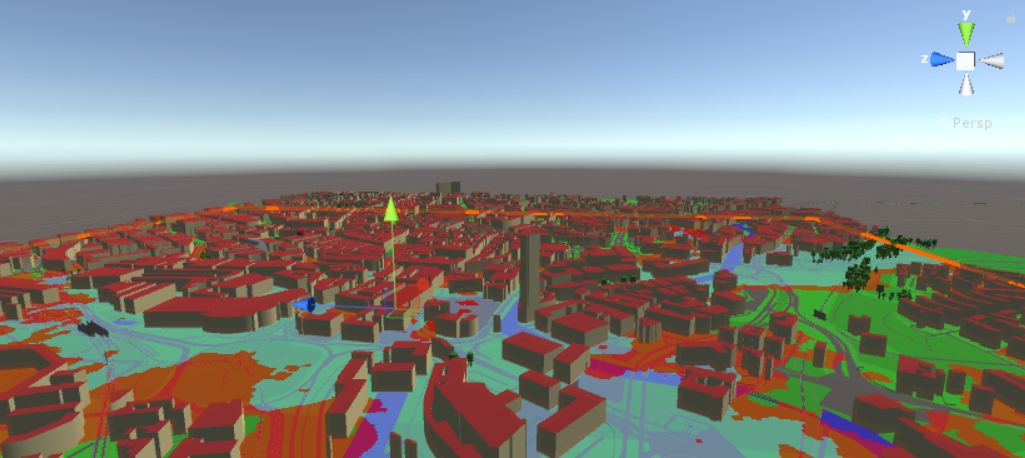
This creates the following effect, by varing the _Transparent parameter:
Next we can add further floodplane warning areas to the shader by modifying the shader to include an extra parameter to encode at rish areas like so:
	fixed4 frag(v2f i) : SV_Target
	{
		// sample the texture
		fixed4 col = tex2D(_MainTex, i.uv);
		fixed4 terrain = tex2D(_BlendTex, i.uv);

		// Set the transparency based on the terrain map height
		float height = (terrain.r + terrain.g + terrain.b) / 3;
		if (height < _Transparency) {
			col.a = 1;
		}else if (height < _Transparency*(1+ _WarningArea)) {
			col.r = 1;
			col.a = 0.7;
		} else {
			col.a = 0;
		}

	return col;

	}